By Texas Flange TeamUncategorized
Bolt Dimensions Explained: A Complete Guide to Measuring Diameter, Threads, and Length
In the industrial world, a “close enough” measurement is often the recipe for a leak, a stripped thread, or a costly shutdown. Whether you are assembling a high-pressure pipeline in a refinery or fitting a lightweight aluminum flange for a fluid treatment facility, the integrity of your connection relies entirely on the fasteners holding it together.
Accurate bolt dimensions (specifically diameter, thread pitch, and length) are the foundation of reliable mechanical fastening and leak-free flange assemblies. If you’ve ever stood in a warehouse holding a greasy bolt, trying to figure out if it’s an M12 or a 1/2-inch UNC, you know it’s not always as easy as passing the eye test.
This guide moves beyond the basics to give you some practical tips, clarifies the often-confusing mix of metric and imperial standards, and explains how correct sizing directly impacts safety. We will cover how to identify major, minor, and shank diameters. We will also discuss how to master thread pitch gauge usage, and the specific rules for measuring bolt length across different head types.
Finally, we’ll look at why this matters for Texas Flange customers, specifically regarding ASME flange stud bolts and flange bolt kits. This will help you translate raw measurements into the correct fastener choices for your next project.
How Do You Measure Bolt Diameter Accurately?
When someone asks for the “size” of a bolt, they are almost always referring to the nominal diameter. This is the major diameter of the threaded portion, from one outside end to the other. Getting this number right is the first step in ensuring correct hole sizing, proper thread engagement, and a predictable clamp load under torque.
If the diameter is off, the bolt might feel loose in a tapped hole (stripping risks) or simply won’t fit through the clearance hole of a flange. You should always do a visual inspection of a bolt to see if threads have been damaged before installation.
The Three Critical Diameter Measurements
To really understand a fastener like a bolt, you have to look at it in three dimensions. Understanding these dimensions helps when you are ordering replacements or designing a joint that requires specific shear strength.
-
Major Diameter (The Nominal Size): This is the largest diameter measured across the crests (the very tops) of the threads. If you measure a bolt and it reads 0.498 inches, it is likely a nominal 0.500-inch (1/2-inch) bolt. Manufacturers always manufacture bolts slightly under the nominal size to ensure they fit into the mating nut or tapped hole, given an oversize thread won’t fit.
-
Minor Diameter (The Root): This is the smallest diameter, measured at the root (the bottom/valley) of the thread groove. While you won’t use this number often to reference bolts, engineers use it to calculate the “tensile stress area” – essentially, how much metal is actually there to hold the load before the bolt snaps.
-
Shank Diameter (The Body): This is the smooth, unthreaded portion of the bolt shaft, assuming the bolt isn’t fully threaded. In many heavy-duty flange connections, the shank diameter provides the bearing surface. For high-precision fitments, the shank is often ground to a specific tolerance to match engineering requirements.
The Technician’s Measurement Checklist
Before you start measuring, here is a practical workflow to help ensure you avoid as many false readings as possible:
-
Zero the Tool: If you are using digital calipers, make sure they are calibrated. Close the jaws completely and hit the “Zero” button. A spec of dirt or metal on the jaw can throw your measurement off by 0.05 mm, so calibration is important.
-
Check for Burrs: If the bolt has been used, check the threads for dings or burrs. Measuring over a damaged thread will give you a larger diameter than reality.
-
Measure the Shank for Roundness: Move your caliper jaws to the unthreaded shaft. Take a measurement, rotate the bolt 90 degrees, and measure again. This helps you spot “ovality,” where a bolt has been warped or stretched out of round formation.
-
Go Across the Crests: For the major diameter, place the broad, flat part of the caliper jaws across the threads. Do not use the sharp tips of the jaws, as they can slip into the thread grooves and give you an inaccurate reading.
Which Tools Are Best for Measuring Bolt Diameter?
You don’t need a laboratory setup to measure bolts, but you do need the right tools for the job. For example, using a tape measure to determine if a bolt is 9/16″ or 5/8″ is a gamble you shouldn’t take, but it could be useful for overall length dimensions. Here are some differences between tools to consider:
1. Digital Calipers
For 95% of field work, a good set of digital calipers is the gold standard. They offer a balance of speed and accuracy, typically providing resolution down to 0.01 mm or 0.0005 inches. They are versatile enough to measure several dimensions on a component, including the outside diameter, inside diameter, and depth / overall length.
2. Micrometers
If you are dealing with critical machined shafts or need to verify the shank diameter for a tight tolerance bearing fit, grab a micrometer. Micrometers aren’t convenient for threads but can offer more practical precision and convenience on smoother surfaces.
3. Optical Comparators & CMMs
You won’t use these in the field, but in manufacturing environments, these tools use light or touch probes to map the exact geometry of a thread profile. This is how manufacturers validate that a batch of ANSI flange stud bolts meets the strict ASME B16 standards before they are shipped to you.
4. Bolt Gauges / Thread Detective
These are the plastic or metal templates you often see hanging in hardware stores. They are excellent for a “quick check” to separate your metric stock from your imperial stock, but they should not be used for critical engineering verification.
What Is Bolt Thread Pitch and How Is It Measured?
Once you know the diameter, you’ve covered the most important measurement. You also need the thread pitch. This is where most installation errors happen. For instance, a 1/2-inch bolt can come in both Coarse (13 threads per inch) and Fine (20 threads per inch). Try to mix them, and you will cross-thread the fastener, ruining both the bolt and the nut.
Metric vs. Imperial: Two Different Languages
The world is divided into two systems, and they measure pitch differently:
-
Imperial (US Customary): Uses TPI (Threads Per Inch). You are literally counting how many thread peaks exist within one inch of length.
-
Example: 1/2″-13 means a half-inch diameter with 13 threads per inch.
-
Metric (ISO): Uses Pitch. This measures the physical distance between one thread crest and the next in millimeters.
-
Example: M12 x 1.75 means a 12mm diameter where the distance between each thread is 1.75mm.
Crucial Note: A higher number in Imperial means a finer thread (more threads packed into an inch). A higher number in Metric means a coarser thread (a wider distance between threads).
How to Use a Thread Pitch Gauge
The most reliable way to identify pitch is thread pitch gauge usage. The thread pitch gauge looks like a Swiss Army knife with serrated metal leaves.
-
Select a leaf that looks close to your bolt‘s threads.
-
Press the teeth into the threads of the bolt.
-
Check for light: Hold it up to a light source. If you see gaps between the gauge and the bolt, it’s not a match. The gauge should fit snugly like a puzzle piece.
-
Read the stamp: The leaf will be stamped with the size in metric or imperial.
Reference Table: Common Thread Standards
|
Thread Standard
|
Pitch / TPI
|
Typical Application
|
|---|---|---|
|
UNC (Unified National Coarse)
|
8–16 TPI (Typical)
|
The standard for general construction and industrial flanges. Coarse threads assemble faster and tolerate dirt/damage better.
|
|
UNF (Unified National Fine)
|
16–32 TPI (Typical)
|
Used in automotive or aerospace where higher tensile strength and finer tension adjustment are required.
|
|
ISO Metric Coarse
|
1.0–2.5 mm
|
The global standard for general engineering. Most “standard” metric bolts are coarse pitch.
|
|
ISO Metric Fine
|
0.75–1.5 mm
|
Used for precision assemblies and thin-walled components.
|

How Is Bolt Length Measured? (It’s Not Always End-to-End)
This is perhaps the most common mistake made when ordering replacement flange bolt kits. If you measure the bolt incorrectly, you may end up with a bolt that bottoms out in a blind hole or one that doesn’t leave enough thread protruding for the nut to grip safely. The rule of thumb depends entirely on the Head Style:
1. Hex Bolts, Flange Bolts, and Socket Head Cap Screws
For any bolt where the head sits on top of the surface, you measure the length from underneath the head to the tip of the bolt.
-
Why? Because the head is not part of the material thickness being fastened. The length represents the part of the bolt that enters the assembly.
2. Flat Head / Countersunk Bolts
For bolts designed to sit flush with the surface (like in a countersunk hole), you measure the length from the very top of the head to the tip.
-
Why? Because the head actually occupies space inside the hole. The entire fastener length is part of the fitment.
3. Stud Bolts (for Flanges)
In the world of industrial flanges (like those supplied by Texas Flange), we often use stud bolts—threaded rods with nuts on both ends.
-
Measurement: Studs are measured from first thread to first thread (excluding the chamfered points at the ends). However, always check if your spec calls for “Overall Length” (OAL), which may or may not include the tip depending on the inquiry.
-
Pro Tip: When in doubt, provide the “Effective Thread Length” to your supplier.
Metric vs. Imperial: The Conversion Headache
“Can I just use an M8 bolt in a 5/16 hole?”
The short answer is: No.
While 8mm (0.315″) and 5/16″ (0.3125″) are incredibly close in diameter, the thread pitches will almost never align perfectly. Forcing a metric bolt into an imperial nut might work for the first two turns, but it will eventually bind. If you force it with a wrench, you are effectively cutting new threads, destroying the integrity of the connection.
When to Convert and When to Replace
If you are managing a facility with legacy equipment, you likely have a mix of ASME (Imperial) and ISO (Metric) equipment.
-
Best Practice: Keep separate bins. Never mix stocks.
-
Emergency Fixes: If you absolutely must convert a hole from one standard to another, the safe way is to drill and re-tap the hole to the new size, or use a thread insert (Helicoil). Do not rely on “close enough” thread engagement.
A helpful tool for the office is a bolt diameter chart that lists both decimal equivalents and thread pitches side-by-side. This stops you from guessing whether that rusty bolt on the workbench is an M12 or a 1/2″. You can check our website for more information on recommended dimensions for ASME flange hardware.
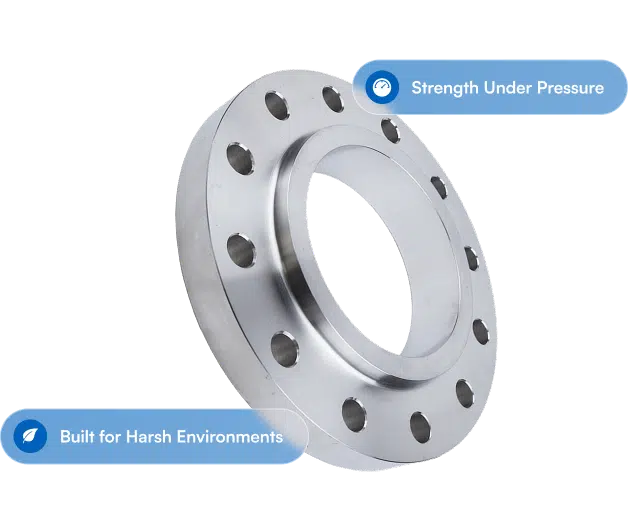
Why Bolt Dimensions Are Critical for Flange Assemblies
At Texas Flange, we see the results of improper bolting every day. In a flange assembly, the bolt acts as a spring. You stretch it (by torquing the nut), and its desire to snap back is what creates the clamp load that crushes the gasket and seals the pipe connection.
The Aluminum Flange Factor
If you are working with aluminum flanges (a growing interest for lightweight industrial applications), precision is even more critical.
-
Soft Material: Aluminum is softer than carbon steel. If you use a bolt with the wrong length and it bottoms out, you might strip the aluminum threads instantly. Torque values will vary.
-
Load Distribution: Because aluminum flanges can flex more than steel, you need to ensure you are using the correct number of bolts and that they are spaced correctly (the Bolt Circle).
-
Galvanic Corrosion: If you use standard stainless steel bolts on an aluminum flange, you create a battery. The aluminum could corrode rapidly. You must measure for and install insulating washers or sleeves, which changes the required bolt length.
ASME B16.5 Standards
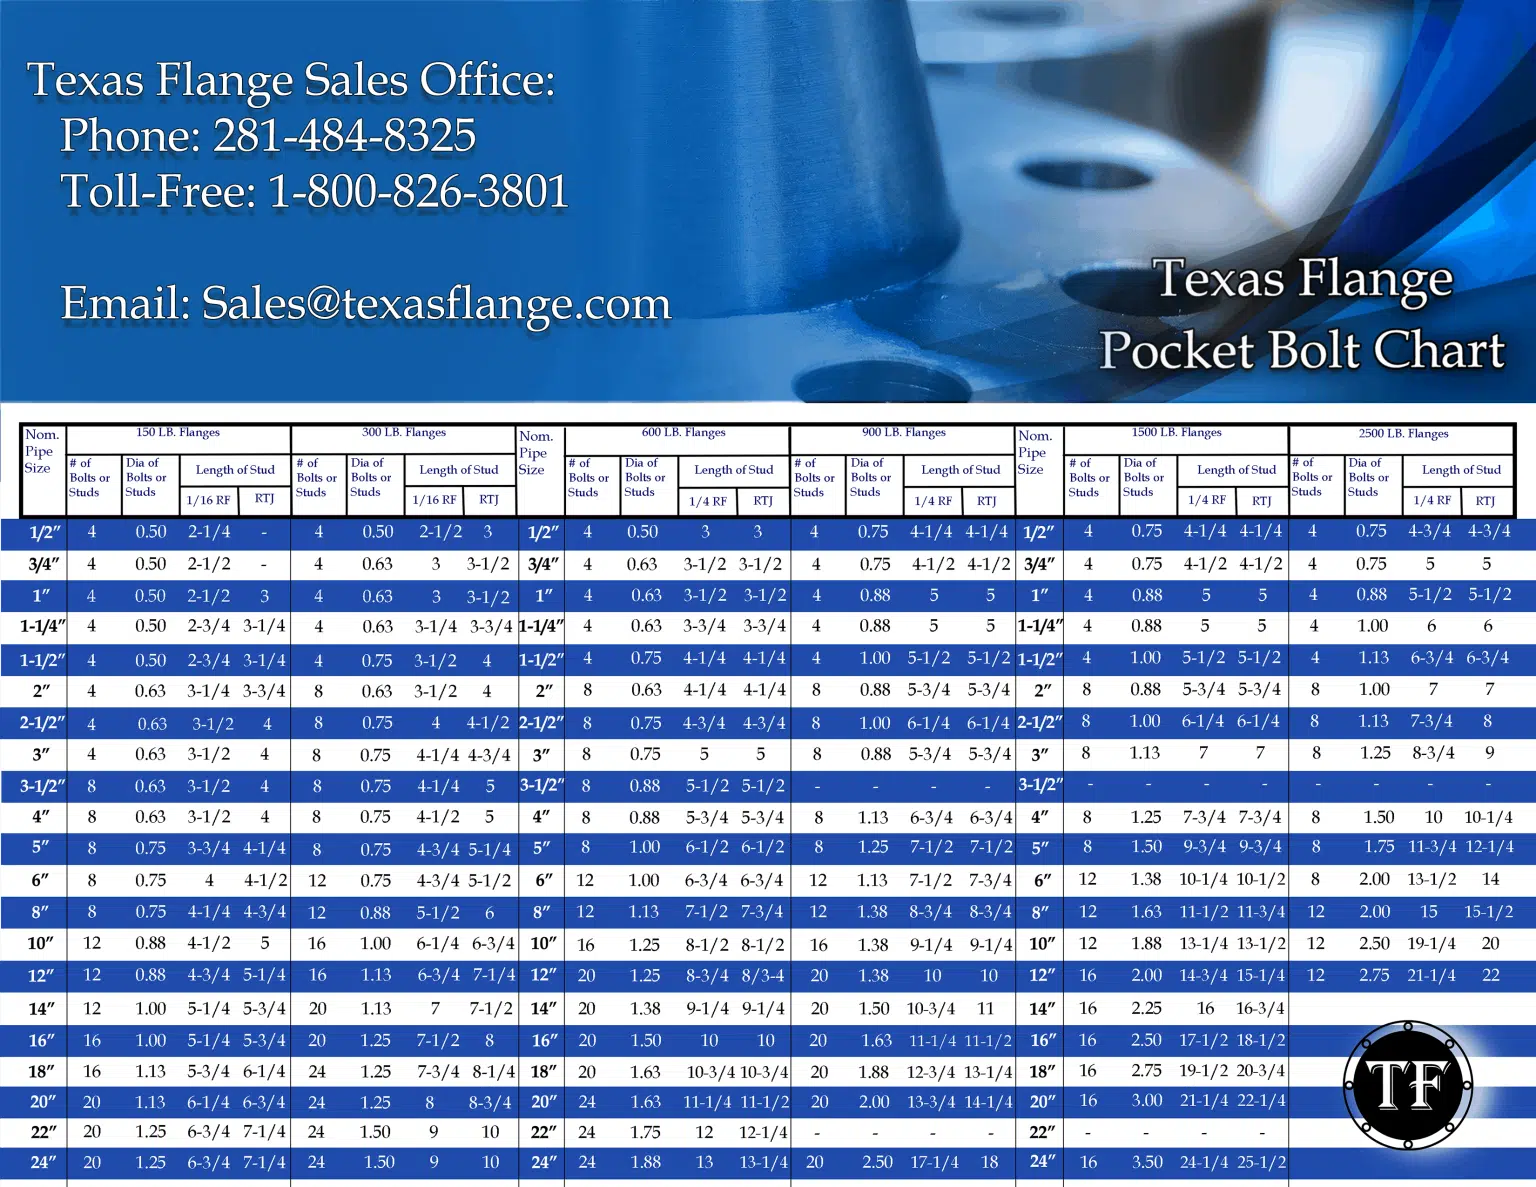
For most industrial applications, you aren’t guessing the dimensions; you are following a map. The ASME B16.5 standard dictates the bolt circle, number of bolts, and diameter for every pressure class (150#, 300#, etc…).
-
Example: A 4-inch Class 150 flange will always require eight 5/8-inch diameter bolts, unless you modify the bolt pattern for a custom application.
-
Knowing these standards helps you order pre-packaged ASME flange stud bolts without having to measure every single existing bolt on a corroded pipe.
Summary: How to Ensure You Order the Right Fasteners
Measurements are only as good as the action you take with them. Whether you are maintaining a refinery in Texas or building a custom skid, follow this updated checklist to ensure you get the right hardware:
-
Check the Head Style: Are you measuring under the head (Hex) or overall (Countersunk)?
-
Verify the Diameter: Use calipers to get the Major Diameter, then round to the nearest nominal size.
-
Confirm the Pitch: Use a pitch gauge. Do not guess. Is the thread coarse or fine?
-
Check the Grade: Dimensions aren’t everything. A Grade 8 bolt has different strength properties than a Grade 5, even if they measure the same.
-
Consult the Standard: If work is being done on flanges, refer to the ASME B16.5 tables. It is safer to first check based on the flange size and class than to measure a potentially incorrect bolt currently installed in the field.
Need Help with Flange Fasteners?
If you are looking for reliable flange bolt kits, custom studs, or aluminum flange solutions, accuracy is our business. Don’t risk downtime with unmatched hardware.
Contact Texas Flange today to discuss your project requirements. Our team can help you navigate the charts, check your dimensions, and point you in the right direction to help you get the exact hardware needed for a safe, leak-free connection.
Key Takeaways for the Technician
-
Diameter: Measure the crests for major diameter.
-
Pitch: Use a gauge to distinguish Metric (mm) from Imperial (TPI).
-
Length: Under the head for hex, or top of the head for countersunk.
-
Safety: Never force mismatched threads. Replace with the exact standard.
By mastering these simple measurements, you protect your equipment, your personnel, and your project timeline.